Welcome to the New Riven Walkthrough
Welcome to annotated walkthrough for the 2024 Riven remake. Whilst much is similar to the original there is much that is new - especially new areas to explore.
You will notice a severe lack of images in this walkthrough. That's because a lot of the enjoyment is discovering things for yourself - which means I don't spoil the surprise (and there are lots of them).
But I have created a cheat sheet with all the necessary clues you need and an option to see an annotated walkthrough.
Download the Cheat Sheet (pdf) or Click here to see annotations and hints
When you begin the Game you will meet Atrus. He explains the situation and leaves you with a linking book.
The situation in summary is: Riven is ruled over by Ghen. His meddling is tearing apart the island which are now unstable. The locals have rebelled and taken refuge and now call themselves the Moiety. Catherine has come to try and fix things but has been imprisoned by Ghen. Ghen himself is trying to get back to Dn'i. Your job is to capture Ghen in a prison book and rescue Catherine.
Don't forget to explore and look around! This is just a basic walkthrough - there is so much more to discover on Riven than is written down here.
Enter the linking book...
Temple Island | Jungle Island | Boiler Island | Survey Island | Prison Island | Tay | 233
Temple Island
Arrive and watch events.
The first person you see is one of Ghen's guards hoping to catch someone like you. The attacker is one of the Moiety
Exit and explore.
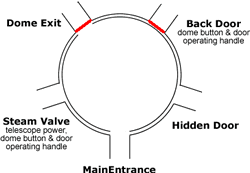
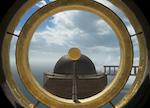
On your left is a telescope. Up above is huge golden dome. Ahead of you and down below is a bridge.
Go to the stairs and look over the cliff to see the guard.
You hear a noise so look up and see the MagLev.
Go up the stairs.
Enter the round room on your left.
You will see 5 of everything. Pull the cords on the beetles to see a story play out.
See locked gate with golden dome behind.
Look through each of the windows. You will see a rotating ball, tunnel and cave.
Exit the room.
Go down stairs to the left.
Here you can see some of the other riven islands.
Examine the gate.
Pull the hinge pin on right and push open the gate.
Go up up ladder and look through the window.
Back to the room entrance.
Press button 4 times.
This aligns the entrance with the cave.
Back to cave and into the round room.
If you make a sketch of the room you should now be able to work out how to get to each of the exits.
Exit out the other side and go down the tunnel.
Close the steam valve.
This connects to the telescope you saw earlier.
Turn round.
Lift lever on left of doorway and hear something opening.
You have just opened the gate that leads to the rotating ball.
Press button on the right twice.
This aligns the exit with the rotating ball.
Enter the room and out the other side.
Examine the rotating ball. See the icons stamped into the metal.
Turn round to face the doorway, on the left is a walkway with a small telescope.
Look into the telescope and see the icons flashing by.
You need to press the button on the top when the icon for the island aligns with the matching icon on the dome. If you have a play you might get lucky!
Go back to the door.
Lift the lever on the left (something opens) and press the button twice.
You have just opened the gate that leads to the golden dome.
Enter the round room and out the main entrance.
If you go back down the stairs you may find the thief has dissapeared...
Press the button twice.
This aligns the exit with the golden dome.
Cross the room and out to the golden dome.
In the centre is a linking book.
Note the 5 canisters with tubes connecting to the outer walls. The button on the right has 5 white dots.
Now walk round the outer walkway.
See the 5 icons. One of them overlooks the rotating ball: a circle with a dot.
Keep a note of all 5 icons and the islands you can see - they are really important to solving the puzzles of Riven.


Go down to the lower level.
Out the first door and round to the right.
Follow the path and over the bridge.
Open the door and enter the room.
Sit on the chair.
The left lever opens a door (always useful).
The right lever lifts and lowers a bridge (leave it down).
Ghen would arrive here via a bridge from his laboratory on a different island. He could then lower the bridge and open the door to a temple (which you will soon visit) so the locals could enter to hear his preachings. This was all shown in the pictures behind the beetles in the round room.
Leave the room and back to the dome.
Go to the next door.
Outside is a long bridge. Pull the lever on the right to close the steam valve. Oops.
This was the bridge Ghen used to access his secret room from his laboratory. But not anymore. Because you broke it.
Back to the round room main entrance.
Press the button 3 times.
This aligns the exit with the rotating ball.
Out to the rotating ball and the telescope on the right.
Press the button when you see the correct icon (circle with a dot).
When the ball stops go inside.
Things happen...
Starry Expanse
Down the ladder and go to the lowest level.
See the 4 other golden hemispheres.
This sort of makes sense. When you entered the ball you linked to the starry expanse. There are 5 islands hence the 5 hemispheres here. Only a hemisphere as the other half is back in Riven.
Press the blue button on the left to align the central platform.
On the right should be a wheel which would extend the bridge but it's missing.
Go take a look if you want and play with the controls.
The important thing to note are the flashing lights on the control ball. This indicates if a bridge is extended. Look into space and you should see another pair of flashing lights. This will become important much later on.
Back up the walkway until you get to the marble machine.
Pull the lever to the left, centre and then right.
Press the button.
Things happen and there is a whoosh.
Back up to the hemisphere and return to Temple Island.
Temple Island
Back to the main entrance and press the button twice.
Go to the centre of the dome.
See one of the dots on the button and one of the cannisters are both lit.
This tells you the charged marble is back in Riven and ready for use. Four more to go.
Exit the dome and out over the bridge.
Before you cross the bridge look down over the cliff and the guard has gone...
Down the tunnel and open the door.
This is the temple.
At one end is a metal cage similar to the one in the hidden room. This is where the islanders would hear the words of Ghen. Also note the creatures and offerings on either side.
Exit out the main door.
This is the door you opened earlier. Just outside look up and you can see the camera Ghen uses to observe the arrival of the islanders.
Press the blue button and wait...
This is the MagLev - the main means of transport between the islands.
Climb on board and sit down.
Move the left lever to rotate the MagLev.
Move the middle level to set off.
Jungle Island
Exit the MagLev.
This is the largest of the 5 islands and there is much to do. I'd suggest is probably the most important.
Enter the tunnel.
See the water pool on the right, the water trough and the totem.
Continue up the tunnel and outside.
Go down to the beach and see the whales sunning themselves.
Go left to the bucket on the ground.
Look up and grab the lens.
Look down at the bucket and you can now see the paint. You will also see the butterflies are white.
Put the lens away.
You will be using this lens a lot. If you are ever unsure of something, use the lens.
Back along the beach past the lagoon and up the steps on the far side.
Go to the totem.
Use your lens and rotate the wheel until the white marks align.
Note the position of the segments in the centre.
The segments change each time you visit Riven!
Turn to the tree using your lens to see the blooms. Interesting...
Now go down the tunnel.
This is the Rivenese village.
Your path into the village is blocked by a raised bridge.
Go down the stairs to the schoolroom.
Inside go to the table on the left.
The game will teach you the Riven numbers. Pull the ring and count the drops. The number symbol appears in the little window. When the little figure gets eaten by the animal the game resets.

Examine the sheet next to the game.
This is a look up table for the Riven and Moiety numbers.
You need to fill in the gaps to get the full set of Moiety numbers.
It does take some time to fully understand the numbering systems but worth the effort. Riven uses a base 5 system and the Moiety use a base 6 system (we use a base 10 system). This will help to work out the sequences.
Note the number for the tree totem.
The cage at the front of the room seems to show a recording of Ghen when you turn the handle.
Leave the schoolroom.
Return to the village.
Up the tunnel to the tree.
Down to the beach and back up the stairs on the left.
Go right into the tunnel.
Go to the totem.
Use your lens and rotate the wheel until the white marks align.
Note the position of the segments in the centre and the corresponding Moiety number.
Look up with your lens and see the paint on the stalagtites.
Look down at the water and see the reflection.
Turn to the trough.
Open the tap and wait for the water to fully drain away.
Quickly look down with your lens and see the fishy reflection (you have a few seconds before the trough refills).

You now have a number and associated creature.
Remember the Moiety use a base 6 numbering system. This suggests there are 6 creatures to discover.
Back up the tunnel the go right and climb the stairs.
Cross the bridge
Look right to see the fifth island.
The jungle has been cleared away.
Ghen needed the wood to make the paper for his books.
On the left is a fissure.
On the right fork is a gap in the wall.
Go to the totem.
Use your lens and rotate the wheel until the white marks align.
Note the position of the segments in the centre.
Turn left and you can see the butterflies form the shape of another animal.
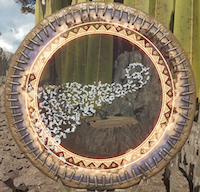
Use your Moiety chart and connect the animal shape to a number.
Look left and see the slope down to a wooden cart.
This is the exception to the MagLev. It's a fun ride you can take now if you want but you are coming back here later.
Back onto the path.
Through the gate and down the stairs.
Note the beetle on the gatepost.
Through the tree tunnel.
Go immediately left down the steps.
Follow the mushroom path.
Go to the totem.
The wheel is missing. How annoying.
Use your lens to see the white paint.
Move about until you can see the animal (the lens changes colour).

Back up to the main path and turn left.
Look up to see the rotating dome and some walkways.
The path forks left and right.
Go right and down to the shrine.
You have now seen this same creature here, in the temple, schoolroom and water pool.
It's called a Whark and is worshipped by the Rivenese.
Back up the path and go right.
At the next junction go right and down to the village.
If you look up you can see a guard tower. As you go down the tunnel note the cave with the hole in the wall and blue lights.
Your way is blocked by a raised bridge.
Go the metal platform.
See the ladder. Now use your lens on the underwater door. It's that creature again!
Go back up the tunnel and straight on.
You will eventually return to the de-forested area.
Go to the wooden cart near the totem.
Climb on the back and pull the lever.
Boiler Island
Climb down the ladder.
Go to the middle of the lake.
Listen carefully and you can hear the steam - there must be a volcanic vent way down below heating the water. The left postion connects to the wood chipper where you arrived. The right postion connects to a ladder leading up to a platform. The middle position connects to the boiler.
Move the lever to the central position.
Go to the boiler.
This is where Ghen would create the woodpulp needed to make paper.
Go to the controls.
You need to drain the water, raise the platform and turn off the burners. This will then unlock the door.
Turn the wheel (the water drains away).
Move the lever on the left to the right (powers the next step).
Raise lever next to window (lifts the platform).
Move lever on the pipe on the right (turns off the gas).
Go to the door.
If the red light is off the door will open.
Enter the boiler.
Down the ladder and up the pipe.
Climb the path and note the rotating ball in the cave down below.
Continue on to the balcony.
Remember the lever in the lake was set to the right. It must power something up here.
Pull the lever to unlock the hatch.
Down the ladder.
Close by you will see a metal sphere. This us what Ghen used to make his paper. It used to be in his laboratory (and the origianl Riven).
Go to middle of the lake.
Move lever back to the right.
Back up the ladder.
Open the doors.
Enter and close the doors.
Closing the doors reveals two new pathways.
Go down the stairs.
Open the door.
Enter and close the door.
Go down hidden tunnel.
Look into the telescope.
Press the button when you see the correct icon (circle with vertical line).
When the ball stops go inside.
Starry Expanse
Down the stairs to the lowest level.
Turn the wheel on the right to extend the bridge.
You should now have three sets of flashing lights.
Press the blue button to align the central platform.
Back up the walkway to the marble machine.
Pull the lever to the left, centre and then right.
Press the button.
Things happen and there is a whoosh.
Back up to the ball and return to Boiler Island.
Boiler Island
Exit the ball and climb the stairs.
Go right down the tunnel.
At the end go to the left and along the rock path.
Turn on the pump. If this pump doesn't start you need to move the lever in the middle of the lake to the right.
Climb down the ladder.
Go to the rock wall on the left.
Use the hammer to collect a rock ball.
Take the ball to the hopper on the rail cart.
Turn the wheel and go for a ride.
Exit the rail cart.
Turn the wheel off to the left to lower the elevator.
Get back on the rail cart.
Engage the lever behind the wheel.
Turn the wheel to go up.
Ghen's laboratory
Lots to see and do in here.
Pick up the rock and exit the elevator.
Go to the second bench on the right.
Drop the rock in the righthand machine.
Turn handle to split the rock.
This gives you a rough marble. The machine in the centre of the room polishes these marbles. You can start the machine if you want to see it in action. Apparently if you watch 15 minutes you get a trophy....
Move marble to the left machine (it floats).
Move the canister on the left out the way and read the two notes.
Move the slider on the machine to a low value.
Lift the handle and press the button.
Increase the value and repeat the test.
When you get the correct value the marble will glow, the needle is vertical and you should hear a bell.
This seems to be Ghen's experiment to charge up the marbles in the same way you did in the Starry Expanse.
Use the calibration sheet to get the correct value for each island (this changes with each visit to Riven).
Go to the table to your right.
Open the trap and see the tree frog (the same shape the butterflies made on Jungle Island).
Read Ghen's journal on the next bench.
Go to the opposite bench.
Use your lens on the totem part.
Note the position of the segments relative to the white mark.
Get the moiety number and associate with the creature you saw in the jungle.
Unlock and open both doors.
One door leads back to the balcony where you began and the long bridge that used to go to Temple island before you broke it.
The other door goes to a MagLev.
Go to the MagLev and travel to Survey Island.
Survey Island
Exit the MagLev.
Note the door on the other platform.
Up the stairs.
Along path to elevator.
You will walk over a magma filled chamber down below.
Up in the elevator and go out onto the observation platform.
Press the button to open the cover.
Arrange the tiles so they fit in the central square.
These represent the 5 riven islands as they were before Ghen's meddling split them apart. If you click on the marbles the island profiles appear below.
Note the position of the marbles. Really important!

Turn round.
Go through elevator.
On the top of the surrounding walls are lots of Whark tusks.
Go to the telescope (which is leaning over).
Press the button to stop the ball (circle with horizontal bar).
If you use your lens you will see a white paint make under the correct icon. It sort of helps a bit.
Enter the ball.
Starry Expanse
Up the stairs to the end.
Extend the bridge using the wheel.
Press the button to align the walkway.
You should now have four sets of flashing lights.
Up more stairs to the marble machine.
Pull the lever to the left, centre and then right.
Press the button.
Things happen and there is a whoosh.
Back down to the ball and return to Survey Island.
Survey Island
Exit the ball.
Go to the elevator.
Duplicate the marble positions on the code pad and go down.
Exit the elevator.
Go to the viewing platform.
Use the lever on the right.
Rotate to see different locations using the outer rings.
Click the icons to turn on the lights in each location.
Get the colours for all 6 icons.
You can now connect a colour, icon and marble position for each island.
You should also have met a live Whark.
Use the lever on the left.
See views of various Riven location including Catherine in her prison.
Climb down.
Back to the elevator and go up.
Back down the path to the MagLev.
Rotate the MagLev to access the other platform.
Exit and go out the door.
You are now in that chamber you saw from the pathway up above.
Pull the lever.
Enter the elevator.
Press button to go down.
Exit elevator.
Follow the man...
Looks like another of Ghen's minions.
Call the MagLev.
Leave Survey Island.
Jungle Island
Leave the station.
Press button to open the door.
Move lever the middle position.
Go up.
Pull lever to open the ramp.
Check your location.
Move lever the top position.
Go up and exit.
Go forward then right.
Go to the telescope.
Press the button to stop the ball (eye with a slit).
Go to the ball and enter the Starry Expanse.
Starry Expanse
Go down the ladder twice.
Extend the bridge and align the walkway.
You should now have five sets of flashing lights.
Go up the ladder to the marble machine.
Pull the lever to the left, centre and then right.
Press the button.
Things happen and there is a whoosh.
Don't leave the starry Expanse just yet.
You have been to four of the golden hemispheres them but there is no way to access the fifth from Riven (I've tried everything).
Go to the central structure.
Look at the sphere with the engraved markings and flashing lights.
Each ring has an icon that connects with the golden balls.
If you look at the left of the sphere you should see the prison island icon.
Go to the controls.
You need to align the prison island icon with the pointer.
- Turn the bar horizontal
- Rotate the wheel clockwise until the ring with the prison island icon is aligned with the pointer
- Turn the bar vertical
- Rotate the wheel clockwise until the ring with the prison island icon is horizontal
- Turn the bar horizontal
- Rotate the wheel clockwise until prison island icon aligns with the pointer

Step back and go to the marble machine.
Pull the lever to the left, centre and then right.
Press the button.
Things happen and there is a whoosh.
Go to the golden ball and leave the Starry Expanse.
Prison Island
Before Riven broke up this is where Ghen used to control things. He cut down the tree to build his headquarters.
Climb down the ladder.
Go left onto the beach.
Follow the path to the totem.
Use your lens and rotate the wheel until the white marks align.
Note the position of the segments in the centre.
Go to the post with the Riven knives stuck in the sides.
Pull down the viewer.
Look through the lens on the top with your lens.
Note the fishy icon and equate this with the Moiety number.
Go up the ladder.
Follow the path along the roots.
Go up the ladders.
Meet Catherine and listen to her instructions.
All the way back to the metal walkway.
Go up the stairs and into the building.
Examine the mechanism on the right.
Listen to the sounds for each button (tick, trill, bell).
Exit the building.
Go left up the stairs to the telescope.
Use the button to stop the ball (vertical eye with a dot).
Go to the ball and return to the Starry Expanse.
Starry Expanse
Go to the central platform.
Change the alignment back to Jungle Island icon (eye with a slit).
Go to the golden ball.
Leave the Starry Expanse.
Jungle Island
Go round the back of the ball.
Go up the stairs.
Open the door and enter the building.
Pull the left lever to rise up.
Pull the right lever to close the floor of the structure down below.
At the top of the structure there is plank crossing to another balcony.
Go back down.
Take the tree elevator back down to the MagLev station.
Rotate the MagLev to access the other platform.
Exit and go round the rocks to the chamber at the end.
Go up the tunnel on your left.
Move the lever to extend the platform.
Climb into the submarine.
There are three controls. The lever on the right starts the submarine. The lever at the front rotates the submarine. The dial in the middle sets the station.
Move the peg to the top right position.
Push the lever on the right.
Enjoy the ride.
Exit the submarine.
Turn the wheel to extend the bridge.
Follow the path round to the right and lower the bridge.
Back along the path and up three ladders.
If you continue along the path and look down into the water you will see lots of familiar fish
Go left.
Up another ladder.
Follow the path and lower the bridge.
Back along the path and up another ladder.
There is a little path off to the left. Go to the door of the hut and knock 5 times...
Follow path all the way to the reservoir.
Move the funnel to the middle.
Open the spout.
Wait for the tree to bloom.
Back down the path and down the ladder in the shade.
Go right and follow path to the tree.
Use your lens to see the beetle.

(you may need to check the totem if you have forgotten the number).
Back to the village.
Down one ladder.
Follow path to where you first climbed up.
Go left and follow path to the steam.
Pull the lever on the far side to close the mouth of the Whark.
Look down to see steam.
Back along path.
Down three ladders.
See the steam and the water vortex.
Back to the submarine on the island.
Move the middle lever to the right (to rotate the submarine).
Move the peg to the bottom right.
Push the lever on the right.
You can exit the sub and see what's at the bottom of the ladder.
Note the heater down below the submarine
Back to the submarine.
Move the lever to the left.
Move the peg to the top right.
Push the lever on the right.
Exit the submarine and run round to the dock.
Down the ladder.
Go to the door.
If the door isn't open wait for a rush of steam.
Enter and go down the tunnel.
Go to the totem.
Use your lens and rotate the wheel until the white marks align.
Note the position of the segments in the centre.
Look up and you will see the painted insect in the chimney.

You should now have six numbers from the totems and six corresponding animals.
If you haven't you need to go get them now. There are five on Jungle Island and one on the Prison Island plus the clue in Ghen's lab. The numbers you get in the school room.
Up the tunnel, out the door and up the ladder.
If you have taken too long the vortex closes. To turn the heater back on pull the lever outside the door.
Go to the submarine on the island.
Move the peg to the bottom left.
Push the lever on the right.
Exit the submarine.
Press the bottom button.
When the elevator arrives press the middle button and jump on board.
This is an execution platform. Prisoners would be hung from the elevator, Ghen would open the base and the prisoners lowered to be eaten by a Whark. You saw this in the game in the school room.
Go to the door and see the prisoner.
Turn wheel on the right to open the door.
Go to the jail cell - no prisoner!
Use your lens to examine the walls.
Press the tip of the blade.
Enter the tunnel.
Follow the trail with your lens.
Turn round and flick the marbles (there are 6).
They light up because they energise when they strike the plate. Similar to the machine in Ghen's laboratory.
Push the door on the left.
Go down to the secret chamber.
This is where you need those animals and numbers.
You should have a beetle, fish, flea, whale, frog and whark (but not in that order - each game is different).
Put the animals in the right order from one to six.
Now lift the stones in the same order.
Wait for the book to appear.
If you don't get the book your sequence was incorrect.
Enter the linking book.
Tay
Turn round and examine the totem.
Watch events.
Wake up and go to the door.
Go to the window.
Listen to Eti.
Take the books.
Read Catherine's journal.
Go to the door then window.
The cell door opens and you can leave.
You only have one route you can take. Guards block all other paths.
The linking book takes you back to the secret chamber.
Jungle Island
Leave the secret chamber and go back up the tunnel.
Close the rock door to reveal the escape tunnel.
Slide the handle in the wall and exit into the village tunnel.
Catherine's journal gave you a clue as to how to get back in.

Make your way back to Temple Island.
Temple Island
Go to the dome.
Go to the central platform.
Check the five lights are lit around the button on the right.
If not you need to check you have charged all the marbles. Use the lights up above and the icons in the windows to identify the missing marbles.
Press the button.
At the upper lever raise the lever on the left.
Place the five marbles in the correct locations.
Use the island icons and the clues from Survey Island: the colours from the underwater viewer and the marble map on the observation deck.

Now set the slider.
Calculate the values using the notes Ghen left in his laboratory, the island icons and the colours from the underwater viewer.
When everything is set pull the lever down and wait for the press to close.
If the button isn't lit something is wrong with your settings.
Press the button, there is more noise and steam and you descend once more.
Enter the linking book.
233 Age
Trapped in a cage all you can do is wait.
Once Ghen has finished his speech enter the Prison Book.
Ghen will eventually follow releasing you.
Put the book away!
Go down the ladder.
Read the diary.
Pick up and open the cryptex.
Listen to and note the sequence of sounds. This changes with each visit to Riven.
Climb back up and exit out the door.
Explore - there might be a surprise in the fire pit.
Back to the building.
Move the lever on the wall to drop the cage.
Start the furnace.
Leave via the linking book.
Boiler Island
You arrive in Ghen's laboratory.
Take any route you like to Prison Island. The fastest is to use the ball on Boiler Island and align the central platform to Prison Island.
Prison Island
Down the ladder and into the building.
Enter the code from the cryptex and pull the lever.
Enter the elevator and go up.
Listen to Catherine.
Wait for the elevator to return (might need to press the button).
Go down and open the ball.
Starry Expanse
Align any of the other icons.
Leave the starry expanse and make your way to Temple Island.
Temple Island
Go to the control panel near big brass telescope.
Check there is steam coming out. If not you need to close the steam valve in the round room tunnel.
Enter the code from Catherine's book (convert the Moiety numbers into Rivenese).
Download the cheatsheet to get all the numbers..
Pull the lever down.
Move the lower lever to the right.
Move the lever left until the crane is above the telescope.
Move the lower lever to the left.
Push the lever up.
Watch what happens...
THE END
New Riven Firmament Obduction Scratches Myst Myst II: Riven Myst III: Exile Myst IV: Revelation Myst V: End of Ages Uru - Ages Beyond Myst Uru - To D'ni Uru - Path of the Shell Dark Fall - The Journal Dark Fall - Light's Out Rhem Rhem 2 - The Cave Rhem 3 - The Secret Library Reah Schizm Riddle of the Sphinx The Omega Stone Amerzone Zork - Nemesis Zork Grand Inquisitor Hype - Time Quest
If you have found this walkthrough useful, discovered an error or have a suggestion then let me know: feedback.
![]() .
.